
Step-by-Step Instructions for Successfully Propagating Schefflera sets the stage for this enthralling narrative, offering readers a glimpse into a story that is rich in detail and brimming with originality from the outset. Schefflera, commonly known as the umbrella tree, is a popular houseplant prized for its lush, tropical foliage.
Propagating this plant can be a rewarding experience, allowing you to expand your collection or share the beauty of Schefflera with others. This guide provides a comprehensive, step-by-step approach to Schefflera propagation, covering various techniques and essential tips for success.
Whether you are a seasoned gardener or a beginner, this guide will equip you with the knowledge and practical instructions needed to propagate Schefflera successfully. From understanding the different propagation methods to nurturing your new plants, we will cover all the essential aspects of this exciting horticultural journey.
Understanding Schefflera Propagation
Propagating Schefflera, also known as the umbrella tree, is a rewarding experience for plant enthusiasts. It allows you to create new plants from existing ones, expanding your collection or sharing with friends. There are various methods for propagating Schefflera, each with its own advantages and disadvantages.
Methods of Schefflera Propagation
Schefflera propagation can be achieved through cuttings, air layering, and seed propagation.
- Cuttings: This is the most common and easiest method. It involves taking stem cuttings from a healthy Schefflera plant and rooting them in a suitable medium.
- Air Layering: This method involves rooting a stem while it is still attached to the parent plant. It is a slower process but offers a higher success rate.
- Seed Propagation: This method involves sowing Schefflera seeds in a suitable medium. It is the most time-consuming and challenging method, but it can be rewarding for those who want to start from scratch.
Advantages and Disadvantages of Different Propagation Methods
Each propagation method has its own advantages and disadvantages, which are summarized in the table below.
Method |
Advantages |
Disadvantages |
|---|---|---|
Cuttings |
Easy, fast, high success rate |
May require rooting hormone |
Air Layering |
High success rate, less stress on the parent plant |
Slower process |
Seed Propagation |
Can produce many plants from a single seed |
Time-consuming, low success rate |
Comparing Propagation Methods
Here is a comparison of the different propagation methods based on factors like success rate, time required, and complexity.
Method |
Success Rate |
Time Required |
Complexity |
|---|---|---|---|
Cuttings |
High |
Moderate |
Easy |
Air Layering |
Very High |
Long |
Moderate |
Seed Propagation |
Low |
Very Long |
Difficult |
Preparing for Propagation
Before embarking on the propagation journey, gather the necessary tools and materials, create the ideal environment, and select healthy parent plants. This meticulous preparation ensures a successful and rewarding propagation experience.
Essential Tools and Materials
Having the right tools and materials is crucial for a successful propagation process. This section Artikels the essential items required for propagating Schefflera.
- Sharp Knife or Pruning Shears:A sharp knife or pruning shears is essential for making clean cuts on the Schefflera stem, minimizing the risk of damage and promoting healthy root development.
- Rooting Hormone:Rooting hormone is a powder or liquid formulation that encourages root growth on cuttings. It helps to stimulate the development of new roots, increasing the chances of successful propagation.
- Potting Mix:A well-draining potting mix is essential for Schefflera propagation. It should be light and airy, allowing for adequate air circulation and preventing waterlogging.
- Containers:Choose containers with drainage holes to prevent water accumulation and root rot. The size of the container should be appropriate for the size of the cuttings.
Ideal Environmental Conditions
Creating the right environment is crucial for successful Schefflera propagation. This section explains the temperature, humidity, and light requirements for optimal growth.
- Temperature:Schefflera cuttings thrive in warm temperatures, ideally between 70°F and 80°F (21°C to 27°C). Avoid exposing the cuttings to extreme temperature fluctuations, which can hinder root development.
- Humidity:High humidity is beneficial for Schefflera cuttings. To increase humidity, consider placing the cuttings in a humid environment or covering the container with a plastic dome or bag.
- Light:Schefflera cuttings require bright, indirect light. Avoid exposing them to direct sunlight, which can scorch the leaves.
Choosing Healthy Parent Plants
The health of the parent plant plays a significant role in the success of propagation. Choosing healthy parent plants is essential for ensuring healthy and vigorous cuttings.
- Disease-Free:Select Schefflera plants that are free from diseases and pests. This will help prevent the transmission of diseases to the cuttings.
- Vigorous Growth:Choose plants that exhibit strong, healthy growth. This indicates that the plant is healthy and capable of producing strong cuttings.
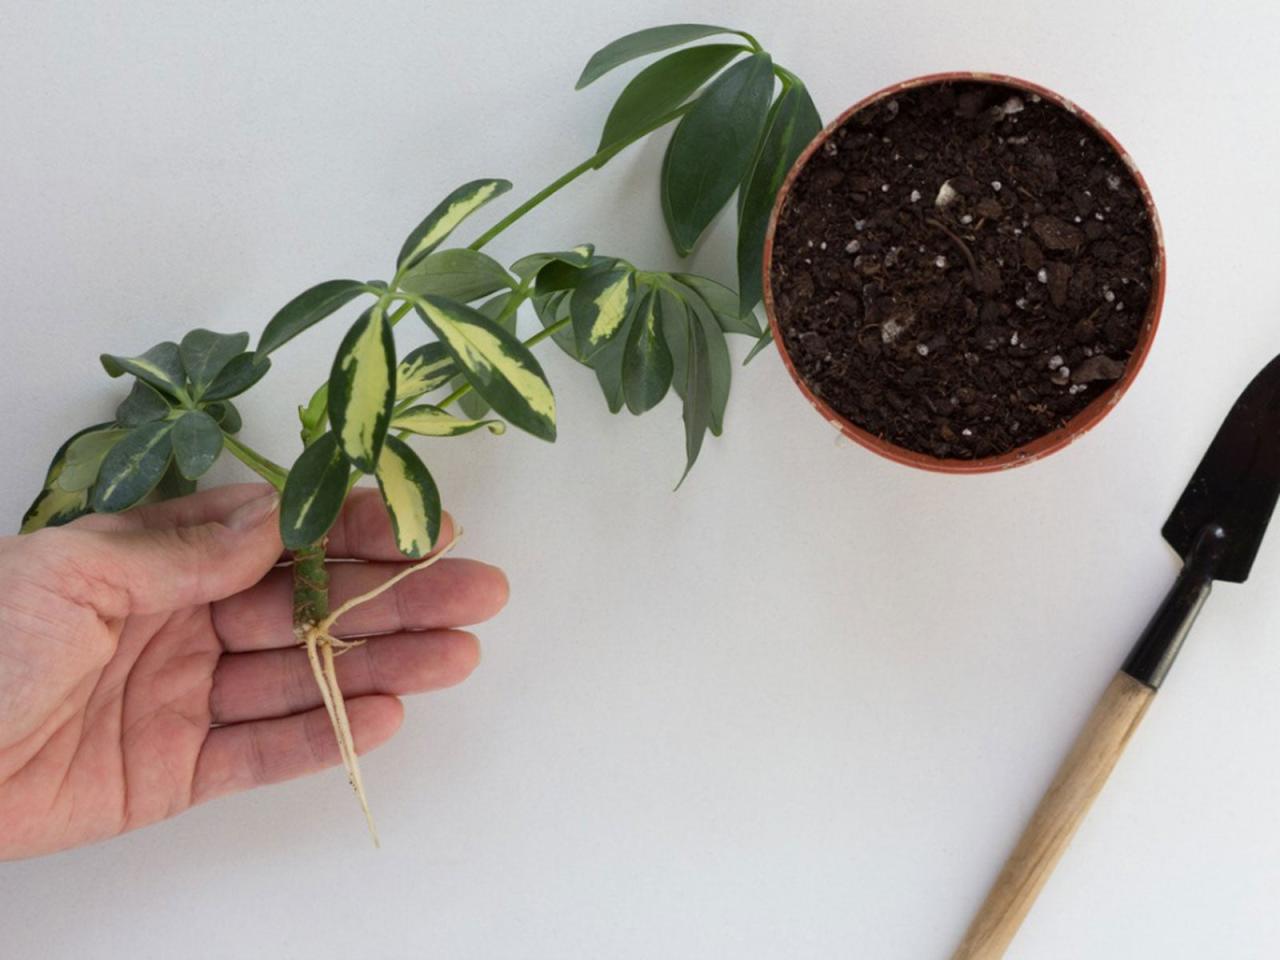
Stem Cutting Propagation
Stem cutting propagation is a simple and effective method for multiplying Schefflera plants. This technique involves taking cuttings from the parent plant and encouraging them to develop roots, ultimately creating new, independent plants. This method is relatively easy and cost-effective, making it a popular choice for home gardeners.
Preparing Stem Cuttings
Before taking cuttings, select healthy, mature stems from the Schefflera plant. These stems should be free of any signs of disease or pests. The ideal cutting should be about 4-6 inches long, with several nodes (the points where leaves grow).
- Make a clean cut: Using a sharp knife or pruning shears, make a clean, angled cut just below a node on the stem. This angled cut will help to increase the surface area for root development.
- Remove lower leaves: Remove all leaves from the bottom 2-3 inches of the cutting. This prevents the leaves from rotting in the rooting medium. Leave the remaining leaves intact to help with photosynthesis.
- Apply rooting hormone: Dip the cut end of the stem cutting into rooting hormone powder or gel. This hormone helps to stimulate root growth and increase the success rate of propagation.
Planting the Stem Cuttings
Once the cuttings have been prepared, it’s time to plant them in a suitable rooting medium.
- Choose a suitable pot: Select a pot with drainage holes to prevent waterlogging. The size of the pot should be appropriate for the number of cuttings you are planting.
- Fill the pot with rooting mix: Fill the pot with a well-draining rooting mix, such as a mixture of peat moss, perlite, and vermiculite. This mix provides the necessary aeration and moisture retention for successful root development.
- Make planting holes: Use a pencil or your finger to create planting holes in the rooting mix, spacing them a few inches apart.
- Insert the cuttings: Gently insert the prepared cuttings into the planting holes, ensuring that the cut end is fully submerged in the rooting mix.
- Water thoroughly: After planting, water the cuttings thoroughly to ensure the rooting mix is moist.
Caring for the Cuttings
After planting, it’s crucial to provide the cuttings with the right conditions to encourage root development.
- Provide warmth and humidity: Place the cuttings in a warm, humid environment. A mini greenhouse or a plastic bag placed over the pot can help to retain humidity. Ideally, the temperature should be around 70-75 degrees Fahrenheit.
- Maintain moisture: Keep the rooting mix consistently moist, but not soggy. Water when the top inch of the mix feels dry to the touch.
- Provide indirect light: Avoid direct sunlight, which can scorch the delicate cuttings. Place them in a location with bright, indirect light.
- Patience is key: Root development can take several weeks or even months. Be patient and continue to care for the cuttings, ensuring they receive the necessary light, moisture, and warmth.
Air Layering Propagation
Air layering is a propagation technique that involves encouraging roots to develop on a stem while it’s still attached to the parent plant. This method is particularly effective for Schefflera, as it allows you to propagate even older, woody stems that may be challenging to root using traditional methods.
Creating a Wound and Applying Rooting Hormone
Before you can encourage root development, you need to create a wound on the stem to stimulate root growth. This wound will encourage the plant to produce roots in that specific area.
- Select a healthy stem on your Schefflera plant that is at least 1/2 inch thick. Ideally, choose a stem that is at least 12 inches long, as this will provide ample space for root development.
- Using a sharp, sterilized knife or pruning shears, make a clean, angled cut about 1 inch long around the stem. The cut should be deep enough to expose the cambium layer, which is the layer just beneath the bark that contains cells responsible for root growth.
- After making the cut, gently scrape away a small section of the bark above the cut to expose the cambium layer more fully. This will help to promote root growth by allowing the rooting hormone to come into direct contact with the cambium.
- Apply a generous amount of rooting hormone powder to the exposed cambium layer. Rooting hormone contains plant growth regulators that stimulate root development. You can find rooting hormone powder at most garden centers or online.
Wrapping the Wound
Once the rooting hormone is applied, you need to create a moist environment around the wound to encourage root growth. This is achieved by wrapping the wound with sphagnum moss and plastic wrap.
- Moisten a handful of sphagnum moss with water. Sphagnum moss is an excellent material for air layering because it holds moisture well and provides a suitable environment for root development. Ensure the moss is damp but not dripping wet.
- Wrap the moist sphagnum moss around the wounded area of the stem, ensuring that the moss is in contact with the rooting hormone. Secure the moss in place using a piece of twine or a rubber band.
- Cover the moss and the wound with a piece of clear plastic wrap. This will help to create a humid environment that will promote root growth. Secure the plastic wrap at the top and bottom of the moss with tape or twist ties. Ensure the plastic wrap is airtight to prevent moisture loss.
Separating the Air Layered Section
After several weeks, the roots will begin to develop within the moss. It’s crucial to monitor the air layering section for root development.
- After approximately 6-8 weeks, gently feel around the wound to check for root development. If you feel a network of roots, it’s time to separate the air layered section from the parent plant.
- Carefully cut the stem below the air layering section, making sure to leave a good portion of roots attached. It’s essential to cut above the air layering section to avoid damaging the newly formed roots.
- Remove the plastic wrap and sphagnum moss from the air layered section. Gently loosen the moss from the roots to avoid damaging them. You can carefully rinse the roots with water to remove any remaining moss.
- Plant the newly rooted Schefflera cutting in a pot filled with well-draining potting mix. Water thoroughly and place the pot in a bright, indirect location. Ensure the soil remains consistently moist but not waterlogged.
Seed Propagation
Propagating Schefflera from seeds is a rewarding experience that can yield numerous plants. However, it requires patience and understanding of the seed germination process.
Collecting and Preparing Schefflera Seeds
Schefflera seeds are typically found within the small, red berries that the plant produces. These berries ripen in the fall and turn a deep red color. To collect the seeds, you can carefully remove the berries from the plant and gently squeeze them to release the seeds.
While propagating Schefflera involves techniques like stem cuttings and air layering, the process can be surprisingly similar to that of carnivorous plants like Venus Fly Traps. In fact, you might be surprised to learn that the secret to successful propagation for both lies in understanding the plant’s unique needs.
The Hidden Secrets of Venus Fly Trap Propagation Revealed explores these needs in detail, offering valuable insights that can be applied to propagating Schefflera as well. By following the right steps and understanding the crucial factors, you can successfully propagate Schefflera and enjoy the beauty of these versatile houseplants.
- Once the seeds are collected, they should be rinsed thoroughly in water to remove any remaining pulp.
- After rinsing, spread the seeds on a paper towel or a screen to dry completely.
- Once dried, the seeds can be stored in a cool, dry place until ready for planting.
Sowing Schefflera Seeds
To sow Schefflera seeds, you will need a seed starting mix that is well-draining and contains a mix of peat moss, vermiculite, and perlite.
- Fill a seed tray or small pots with the seed starting mix, moistening it thoroughly.
- Make shallow indentations in the mix, about ¼ inch deep.
- Place one seed in each indentation and cover it with a thin layer of seed starting mix.
- Water gently after planting to ensure the seeds are in contact with moisture.
Maintaining Optimal Conditions for Seed Germination
Schefflera seeds require warm temperatures and consistent moisture for successful germination.
- Place the seed tray or pots in a warm location, ideally with temperatures between 70-75 degrees Fahrenheit.
- Cover the seed tray with a clear plastic dome or wrap to create a humid environment.
- Mist the seed starting mix regularly to maintain moisture levels. Avoid overwatering, as this can lead to root rot.
Schefflera seeds typically germinate within 2-4 weeks.
Caring for Propagated Schefflera: Step-by-Step Instructions For Successfully Propagating Schefflera
Once your Schefflera cuttings or air layers have rooted, it’s time to nurture them into healthy, thriving plants. This involves providing the right care, including proper watering, fertilization, and light exposure.
Watering
Watering is crucial for newly propagated Schefflera, as they are establishing their root systems. Allow the soil to dry slightly between waterings to prevent root rot, a common issue for newly propagated plants. Overwatering can lead to root rot, which can be fatal to your Schefflera.
Just like meticulously following the steps to propagate a Schefflera plant, planning a trip to Harvest Moon Orchard requires careful consideration. For the best experience, check out How to Plan the Perfect Visit to Harvest Moon Orchard , a comprehensive guide that covers everything from booking your stay to picking the perfect fruit.
Just as the right technique ensures a thriving Schefflera, planning your visit with this guide will guarantee a fruitful and memorable experience at the orchard.
- Use a well-draining potting mix to ensure excess water can escape.
- Water thoroughly until water drains out of the drainage holes.
- Check the soil moisture before watering. If the top inch of soil feels dry, it’s time to water.
- Avoid letting the soil become completely dry, as this can stress the plant.
Fertilization
Fertilizing your newly propagated Schefflera will provide essential nutrients for growth. Use a balanced liquid fertilizer diluted to half strength.
- Fertilize every two to four weeks during the growing season (spring and summer).
- Avoid fertilizing during the dormant season (fall and winter).
- Over-fertilization can damage roots and lead to nutrient imbalances.
Light Requirements
Newly propagated Schefflera prefer bright, indirect light. Direct sunlight can scorch their delicate leaves.
- Place your propagated Schefflera near a window that receives filtered sunlight.
- Avoid placing them in direct sunlight, especially during the hottest part of the day.
- Rotate the plant regularly to ensure even growth on all sides.
Drainage, Step-by-Step Instructions for Successfully Propagating Schefflera
Providing adequate drainage is essential for preventing root rot in newly propagated Schefflera. Root rot occurs when the soil remains too wet for too long, causing the roots to decay.
- Use a pot with drainage holes to allow excess water to escape.
- Place a layer of gravel or pebbles at the bottom of the pot to improve drainage.
- Avoid overwatering, as this can lead to waterlogging and root rot.
Common Problems
While propagating Schefflera is generally straightforward, you may encounter some common problems.
- Root Rot:Overwatering is the primary cause of root rot. Signs include wilting, yellowing leaves, and a foul odor from the soil. To address root rot, repot the Schefflera in fresh, well-draining soil and reduce watering.
- Leaf Drop:Leaf drop can occur due to various factors, including overwatering, underwatering, low humidity, or sudden changes in temperature. Adjust your watering schedule and provide adequate humidity to prevent leaf drop.
- Pests:Schefflera can be susceptible to pests like spider mites, mealybugs, and aphids. Inspect your plant regularly for signs of infestation and use appropriate pest control methods.
Troubleshooting Common Propagation Issues
While Schefflera propagation is generally straightforward, certain issues can arise during the process. Understanding these potential problems and how to address them can significantly increase your success rate and ensure healthy, thriving plants.
Root Rot
Root rot is a common problem that can affect Schefflera cuttings and air layers. It occurs when the roots are constantly exposed to excessive moisture, leading to fungal growth and decay.
- Symptoms:Wilting leaves, yellowing foliage, a foul odor from the soil, and soft, mushy roots.
- Solutions:
- Repotting:Remove the affected cutting or air layer from its container, trim away any rotted roots, and repot in fresh, well-draining potting mix.
- Watering Practices:Allow the soil to dry out slightly between waterings to prevent excessive moisture.
- Fungicide:Apply a fungicide to the soil and roots to control fungal growth.
- Prevention:Use well-draining potting mix, avoid overwatering, and ensure adequate drainage in the containers.
Fungal Infections
Fungal infections can affect Schefflera cuttings and air layers, causing leaf spots, wilting, and even death. These infections are often caused by poor sanitation or high humidity.
- Symptoms:Leaf spots, discoloration, powdery mildew, and mold growth.
- Solutions:
- Fungicide:Apply a fungicide specifically designed for Schefflera or other houseplants to control the infection.
- Pruning:Remove any infected leaves or stems to prevent the spread of the fungus.
- Ventilation:Ensure adequate airflow around the cuttings or air layers to reduce humidity.
- Prevention:Use sterilized tools for propagation, avoid overwatering, and ensure good air circulation.
Pest Infestations
Schefflera cuttings and air layers can be susceptible to pests such as aphids, mealybugs, and spider mites. These pests can damage the plants, causing stunted growth and weakened foliage.
- Symptoms:Visible pests on the plants, sticky residue on the leaves, discolored or distorted leaves, and webbing.
- Solutions:
- Insecticidal Soap:Apply insecticidal soap to the plants to kill the pests.
- Neem Oil:Neem oil is a natural insecticide that can effectively control pests.
- Horticultural Oil:Horticultural oil can suffocate and kill pests.
- Prevention:Regularly inspect the plants for pests, isolate any infected plants, and maintain good sanitation practices.
Monitoring for Stress or Disease
Regularly monitoring your propagated Schefflera plants for signs of stress or disease is crucial for early detection and intervention. Early identification can help prevent the spread of problems and increase the chances of successful propagation.
- Signs of Stress:Wilting leaves, yellowing foliage, stunted growth, leaf drop, and discoloration.
- Signs of Disease:Leaf spots, powdery mildew, mold growth, and unusual growths or lesions.
End of Discussion
With patience and the right techniques, propagating Schefflera can be a rewarding and enjoyable experience. By following the steps Artikeld in this guide, you can successfully multiply your Schefflera plants and share their beauty with others. Remember, success in plant propagation requires careful observation, consistent care, and a touch of horticultural magic.
So, embrace the process, enjoy the journey, and witness the wonder of new life emerging from your own Schefflera cuttings, air layers, or seeds.
Helpful Answers
What is the best time of year to propagate Schefflera?
The ideal time to propagate Schefflera is during the spring or summer when the plant is actively growing. Warmer temperatures and longer days promote faster root development.
Can I propagate Schefflera from leaf cuttings?
While stem cuttings are the most common method, leaf cuttings are not typically successful for propagating Schefflera. Leaf cuttings lack the nodes (growth points) necessary for root development.
How long does it take for Schefflera cuttings to root?
Root development in Schefflera cuttings can take anywhere from a few weeks to a couple of months, depending on factors like the propagation method, environmental conditions, and the type of rooting hormone used.
What are the signs of a healthy Schefflera cutting?
A healthy Schefflera cutting will have firm, vibrant leaves, and new growth emerging from the nodes. The cutting should also show signs of root development, such as callus formation or new roots emerging from the base.
